 QQ咨询
QQ咨询 阿里旺旺
阿里旺旺 #skype#
如何在AWS上构建企业级VPC私有网络教程
目前,公有云越来越普及,基本上绝大部分的初创型企业都会在企业发展初期,采用公有云上的虚拟机作为服务器来开展业务。
本文主要对AWS上的VPC私有网络的创建与配置进行讲解,并对Web UI上的各个步骤进行了截图,更加形象,也方便大家的理解。
VPC,顾名思义Virtual Private Cloud,即虚拟私有云。
很多企业或项目在发展初期选择了公有云,但基本上无一例外全都选择了最简单的方式来创建虚拟机,即每台虚拟机都有一个公网IP地址,以及私网IP地址。其 中,私网IP地址不可变更,所在的私网IP段不可选择,如果对服务器进行了Stop操作,再次Start之后,私网IP会随机变更;而公网IP地址,则可 以绑定一个IP地址来将其固定。
在这样的一个架构当中,如果服务器数量不多,对安全性,可扩展性,高可用性等各个方面没有什么要求的话,也是能满足需要的。
但是,当服务器数量较多时,也就是说,当企业发展到中期的时候,VPC的重要性就越来越体现出来了,其中,最显著的几个方面为:
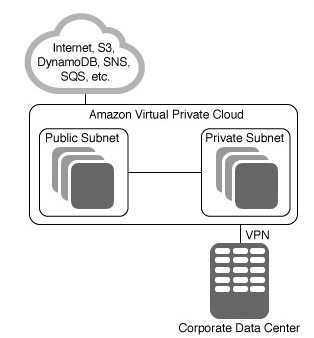
1. 在安全方面,通过构建一个VPC网络,能够将几乎所有的服务器都部署在一个私有网络中,每台服务器都只有一个私网IP,不需要直接面对公网;而直接面对公 网的,则主要是负载均衡与VPN;在这样的一个网络架构中,我们也可以很容易的限制所有服务器的访问入口权限,那就是,每一个需要访问服务器的用户,都需 要首先登陆VPN服务器,然后再通过内网IP与内网DNS域名解析服务来访问所有的服务器;
2. 在高可用,可扩展性方面,可以直接部署LVS/Nginx/HAProxy作为负载均衡服务器,部署Keepalived实现双机热备;
3. 在网络方面,可以创建不同的子网,设置不同的路由,灵活的根据业务来对服务器的网络进行分组;可以与本地IDC机房的私有网络通过VPN互联,即实现所谓的混合云;
架构图示:
配置步骤
1. 在VPC Dashboard当中,选择Your VPCs,点击Create VPC,创建一个VPC;

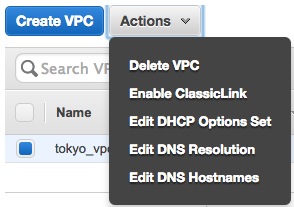
2. 点击Actions,启用ClassicLink
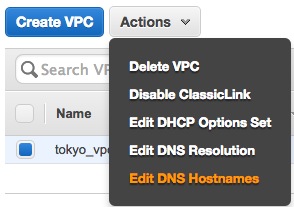
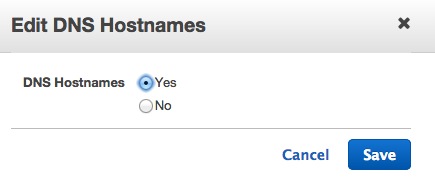
3. 点击Actions,启用DNS hostnames
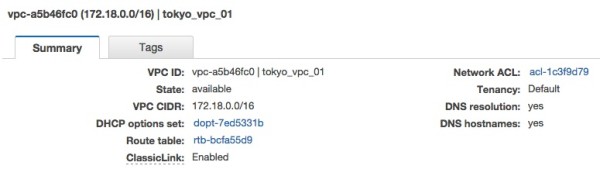
4. 新建的VPC属性页如下所示:
5. 选择Subnets,点击Create Subnet,创建一个Public Subnet;
 0
0
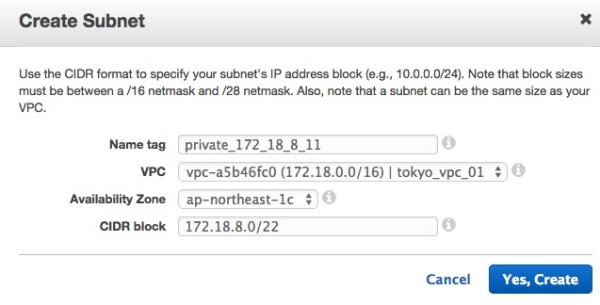
6. 再创建一个Private Subnet;
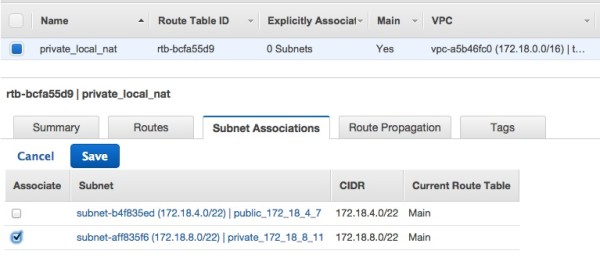
7. 选择Route Tables,将默认的Main路由表命名为private_local_nat,并将这个路由表绑定到Private Subnet上;
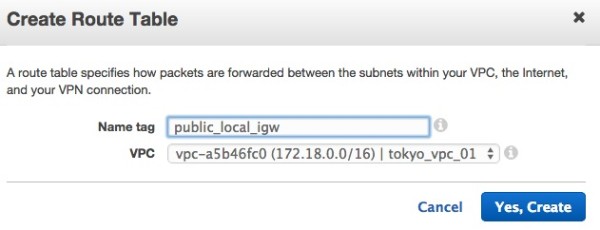
8. 选择Route Tables,点击Create Route Table,创建一个新的路由表public_local_igw,并将这个路由表绑定到Public Subnet上;
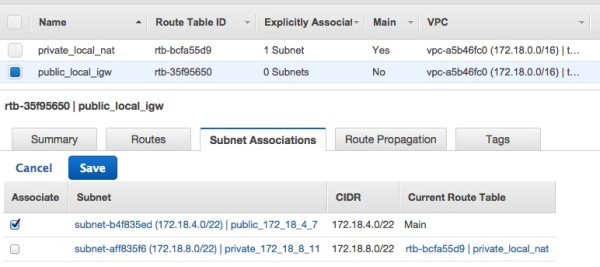
9. 设置完成后的Route Tables页面如下所示:

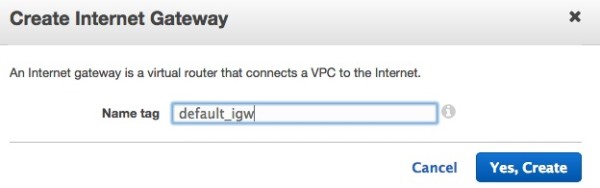
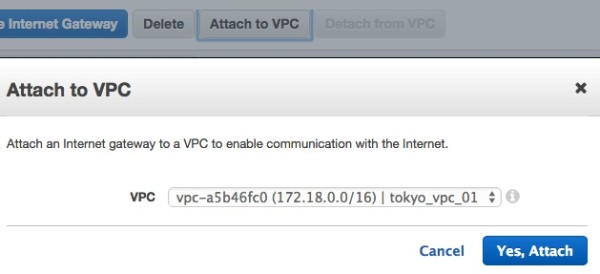
10. 选择Internet Gateways,点击Create Internet Gateway创建一个互联网网关,作为Public Subnet的公网出口;
11. 选择DHCP Options Sets,命名默认的DHCP Options Set为default_dhcp;

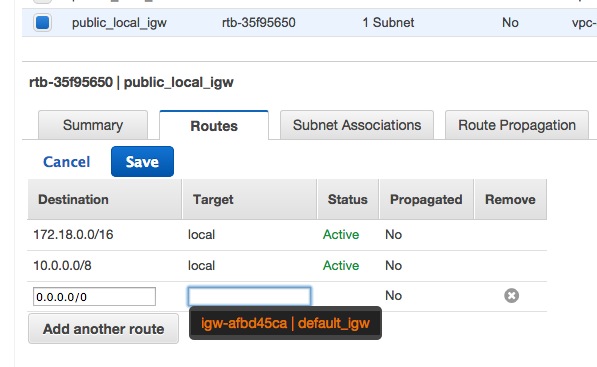
12. 选择Route Tables,点击public_local_igw,增加一条路由,设置新增的Internet Gateway为Public Subnet的默认公网出口网关;
13. 接下来,为了使所有位于Private Subnet内的Instance也能够访问互联网,我们需要创建一个位于Public Subnet内的Instance,并将其配置为可通过iptables进行NAT共享上网,然后将其添加到private_local_nat路由表 中,作为Private Subnet的默认公网出口网关;
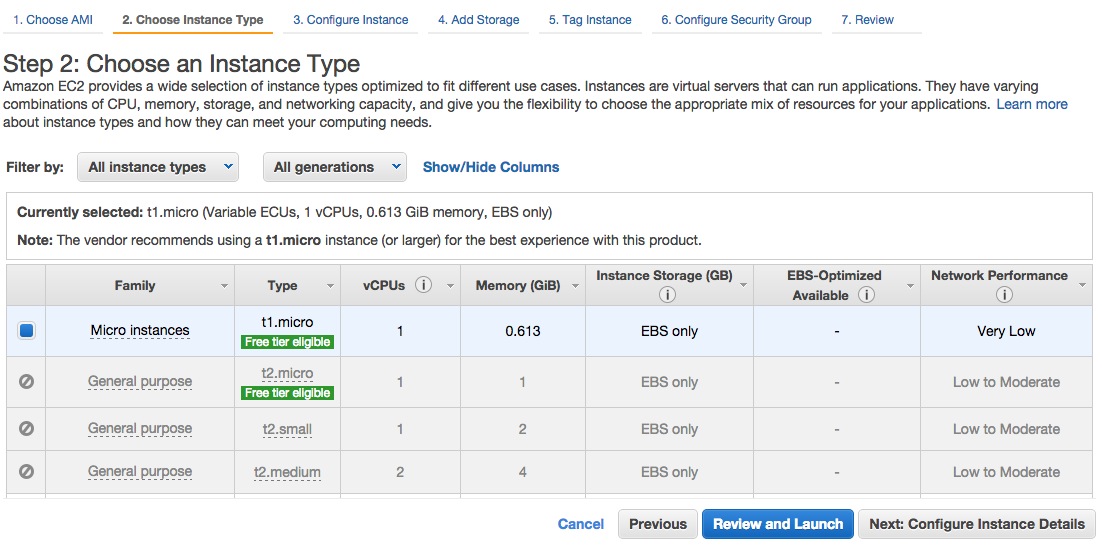
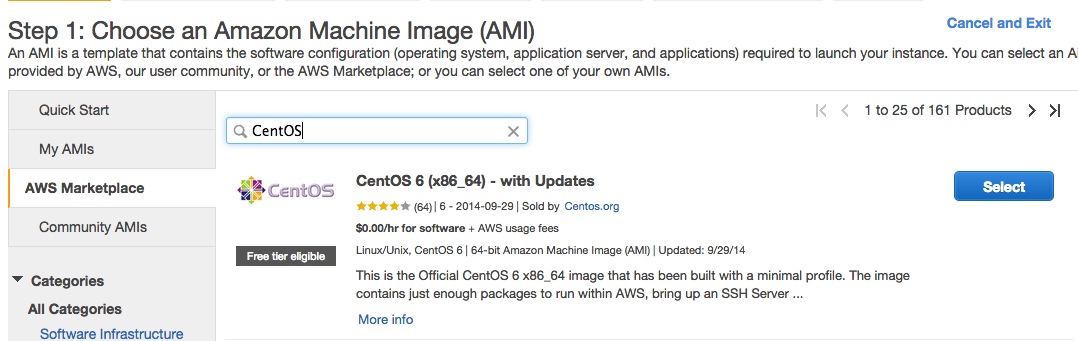
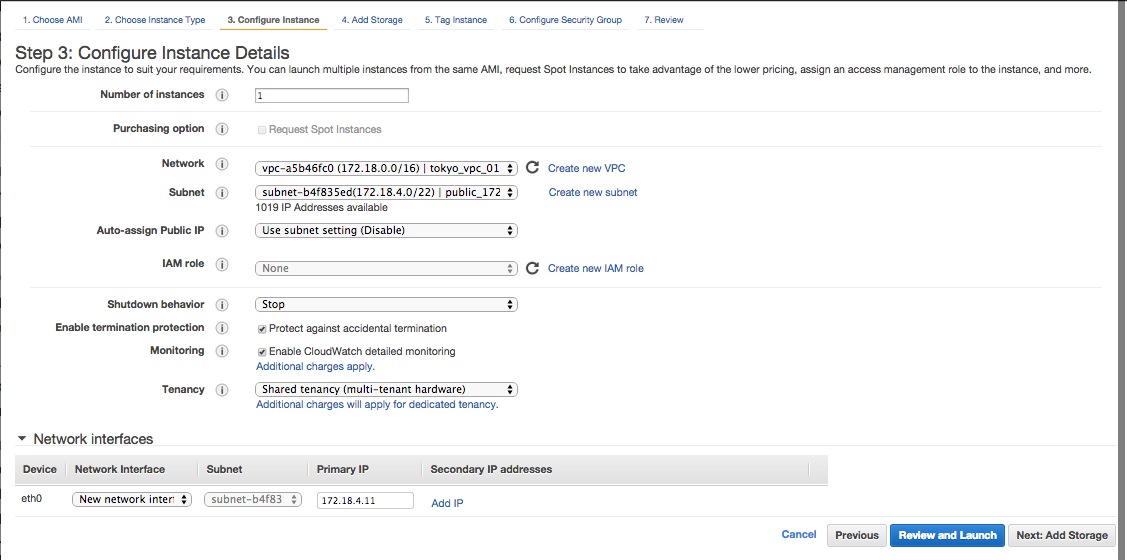
13.1 创建Gateway Instance;
::__IHACKLOG_REMOTE_IMAGE_AUTODOWN_BLOCK__::1


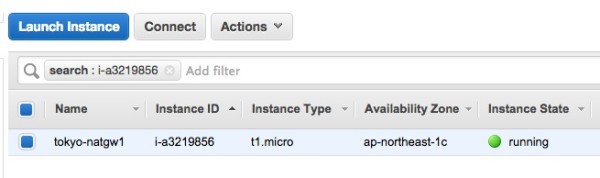
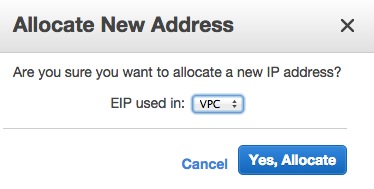
13.2 为Gateway Instance分配一个固定的公网IP;
13.3 登录Gateway Instance,将其设置为可通过iptables共享上网的网关服务器;
[awsok@awsok.com]$ chmod 400 awsok.com-tokyo-keypair.pem
[awsok@awsok.com]$ ssh -i awsok.com-tokyo-keypair.pem root@50.68.53.86
[root@ip-172-18-4-11 ~]# setenforce 0
[root@ip-172-18-4-11 ~]# vi /etc/selinux/config
# This file controls the state of SELinux on the system.
# SELINUX= can take one of these three values:
#     enforcing - SELinux security policy is enforced.
#     permissive - SELinux prints warnings instead of enforcing.
#     disabled - No SELinux policy is loaded.
SELINUX=disabled
# SELINUXTYPE= can take one of these two values:
#     targeted - Targeted processes are protected,
#     mls - Multi Level Security protection.
SELINUXTYPE=targeted
[root@ip-172-18-4-11 ~]# vi /etc/sysctl.conf
# Kernel sysctl configuration file for Red Hat Linux
#
# For binary values, 0 is disabled, 1 is enabled.  See sysctl(8) and
# sysctl.conf(5) for more details.

# Controls IP packet forwarding
net.ipv4.ip_forward = 1

# Controls source route verification
net.ipv4.conf.default.rp_filter = 1

# Do not accept source routing
net.ipv4.conf.default.accept_source_route = 0

# Controls the System Request debugging functionality of the kernel
kernel.sysrq = 0

# Controls whether core dumps will append the PID to the core filename.
# Useful for debugging multi-threaded applications.
kernel.core_uses_pid = 1

# Controls the use of TCP syncookies
net.ipv4.tcp_syncookies = 1

# Disable netfilter on bridges.
net.bridge.bridge-nf-call-ip6tables = 0
net.bridge.bridge-nf-call-iptables = 0
net.bridge.bridge-nf-call-arptables = 0

# Controls the default maxmimum size of a mesage queue
kernel.msgmnb = 65536

# Controls the maximum size of a message, in bytes
kernel.msgmax = 65536

# Controls the maximum shared segment size, in bytes
kernel.shmmax = 68719476736

# Controls the maximum number of shared memory segments, in pages
kernel.shmall = 4294967296
[root@ip-172-18-4-11 ~]# sysctl -p
net.ipv4.ip_forward = 1
net.ipv4.conf.default.rp_filter = 1
net.ipv4.conf.default.accept_source_route = 0
kernel.sysrq = 0
kernel.core_uses_pid = 1
net.ipv4.tcp_syncookies = 1
kernel.msgmnb = 65536
kernel.msgmax = 65536
kernel.shmmax = 68719476736
kernel.shmall = 4294967296
[root@ip-172-18-4-11 ~]# vi /etc/sysconfig/iptables
# Firewall configuration written by system-config-firewall
# Manual customization of this file is not recommended.
*nat
:PREROUTING ACCEPT [0:0]
:POSTROUTING ACCEPT [0:0]
:OUTPUT ACCEPT [0:0]
-A POSTROUTING -s 172.18.0.0/16 -o eth0 -j MASQUERADE
COMMIT
[root@ip-172-18-4-11 ~]# /etc/init.d/iptables restart
iptables: Setting chains to policy ACCEPT: filter          [  OK  ]
iptables: Flushing firewall rules:                         [  OK  ]
iptables: Unloading modules:                               [  OK  ]
iptables: Applying firewall rules:                         [  OK  ]
[root@ip-172-18-4-11 ~]# chkconfig iptables on
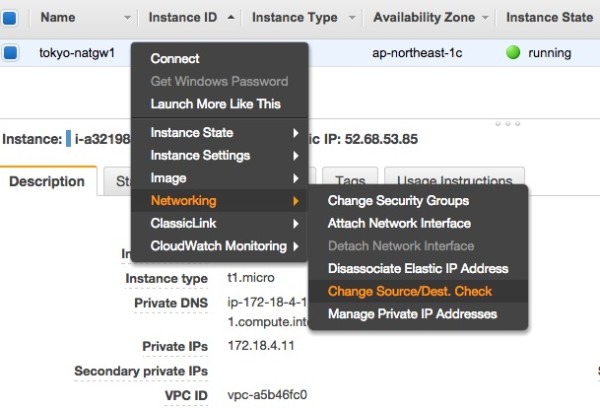
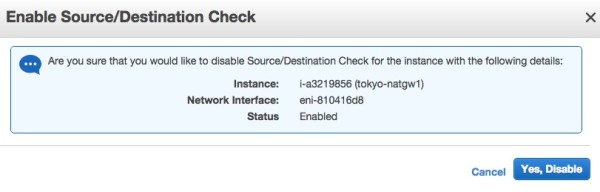
13.4 修改Gateway Instance的Network属性,禁用Source/Dest. Check;
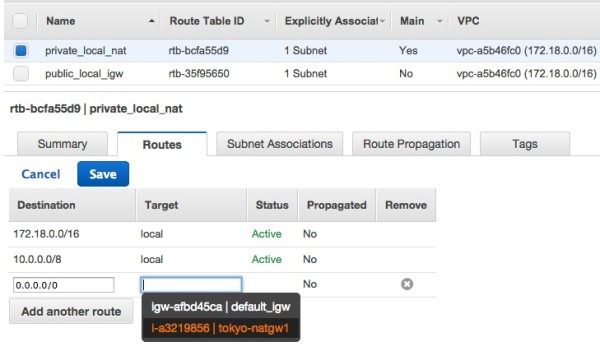
13.5 选择Route Tables,点击private_local_nat,增加一条路由,设置新增的Gateway Instance为Private Subnet的默认公网出口网关;
14. 至此,在AWS上创建一个企业级的VPC的过程就基本完成了,该VPC默认包括了两个Subnet,其中Public Subnet中的Instance可以直接绑定公网IP,并与Private Subnet中的Instance通过私网IP进行通信;而位于Private Subnet中的Instance不能绑定公网IP,但是可以通过Gateway Instance访问互联网,同时与Public Subnet中的Instance进行通信;
参考资料:
http://docs.aws.amazon.com/AmazonVPC/latest/UserGuide/VPC_Scenario2.html