 QQ咨询
QQ咨询 阿里旺旺
阿里旺旺 #skype#
在CentOS 6上部署OpenVPN Server
参考资料:
https://www.digitalocean.com/community/tutorials/how-to-setup-and-configure-an-openvpn-server-on-centos-6
http://www.unixmen.com/setup-openvpn-server-client-centos-6-5/
http://docs.ucloud.cn/software/vpn/OpenVPN4CentOS.html
相关配置:
OS: CentOS 6.4 x86_64 Minimal
1. 安装EPEL扩展库
# yum install http://dl.fedoraproject.org/pub/epel/6/i386/epel-release-6-8.noarch.rpm
2. 安装所需依赖软件包
# yum install -y openssl openssl-devel lzo lzo-devel pam pam-devel automake pkgconfig
3. 安装OpenVPN
# yum install openvpn
4. 下载easy-rsa 2.x
# wget https://github.com/OpenVPN/easy-rsa/archive/release/2.x.zip
# unzip 2.x.zip
# cd easy-rsa-release-2.x
# cp -rf easy-rsa /etc/openvpn/
5. 配置easy-rsa vars
# cd /etc/openvpn/easy-rsa/2.0/
# ln -s openssl-1.0.0.cnf openssl.cnf
# chmod +x vars
修改vars文件中以下配置项:
# vim vars
...
# Increase this to 2048 if you
# are paranoid.  This will slow
# down TLS negotiation performance
# as well as the one-time DH parms
# generation process.
export KEY_SIZE=1024

...
# These are the default values for fields
# which will be placed in the certificate.
# Don't leave any of these fields blank.
export KEY_COUNTRY="JP"
export KEY_PROVINCE="JP"
export KEY_CITY="Tokyo"
export KEY_ORG="awsok.com"
export KEY_EMAIL="awsok@gmail.com"
export KEY_OU="MyOrganizationalUnit"
...
执行vars文件使环境变量生效:
# source ./vars
NOTE: If you run ./clean-all, I will be doing a rm -rf on /etc/openvpn/easy-rsa/2.0/keys
6. 生成所需的各种证书文件
清除旧的证书:
# ./clean-all
生成服务器端CA证书,由于在vars文件中做过缺省设置,在出现交互界面时,直接一路回车即可:
# ./build-ca
Generating a 1024 bit RSA private key
..............................++++++
.....................................++++++
writing new private key to 'ca.key'
-----
You are about to be asked to enter information that will be incorporated
into your certificate request.
What you are about to enter is what is called a Distinguished Name or a DN.
There are quite a few fields but you can leave some blank
For some fields there will be a default value,
If you enter '.', the field will be left blank.
-----
Country Name (2 letter code) [JP]:
State or Province Name (full name) [JP]:
Locality Name (eg, city) [Tokyo]:
Organization Name (eg, company) [awsok.com]:
Organizational Unit Name (eg, section) [MyOrganizationalUnit]:
Common Name (eg, your name or your server's hostname) [awsok.com CA]:
Name [EasyRSA]:
Email Address [awsok@gmail.com]:
生成服务器证书,仍然是在出现交互界面时,直接一路回车,并在结尾询问[y/n]时输入y即可:
# ./build-key-server awsok.com
Generating a 1024 bit RSA private key
............++++++
................++++++
writing new private key to 'awsok.com.key'
-----
You are about to be asked to enter information that will be incorporated
into your certificate request.
What you are about to enter is what is called a Distinguished Name or a DN.
There are quite a few fields but you can leave some blank
For some fields there will be a default value,
If you enter '.', the field will be left blank.
-----
Country Name (2 letter code) [JP]:
State or Province Name (full name) [JP]:
Locality Name (eg, city) [Tokyo]:
Organization Name (eg, company) [awsok.com]:
Organizational Unit Name (eg, section) [MyOrganizationalUnit]:
Common Name (eg, your name or your server's hostname) [awsok.com]:
Name [EasyRSA]:
Email Address [awsok@gmail.com]:

Please enter the following 'extra' attributes
to be sent with your certificate request
A challenge password []:
An optional company name []:
Using configuration from /etc/openvpn/easy-rsa/2.0/openssl-1.0.0.cnf
Check that the request matches the signature
Signature ok
The Subject's Distinguished Name is as follows
countryName           :PRINTABLE:'JP'
stateOrProvinceName   :PRINTABLE:'JP'
localityName          :PRINTABLE:'Tokyo'
organizationName      :PRINTABLE:'awsok.com'
organizationalUnitName:PRINTABLE:'MyOrganizationalUnit'
commonName            :PRINTABLE:'awsok.com'
name                  :PRINTABLE:'EasyRSA'
emailAddress          :IA5STRING:'awsok@gmail.com'
Certificate is to be certified until Jan 26 09:49:38 2025 GMT (3650 days)
Sign the certificate? [y/n]:y


1 out of 1 certificate requests certified, commit? [y/n]y
Write out database with 1 new entries
Data Base Updated
生成DH验证文件:
# ./build-dh
Generating DH parameters, 1024 bit long safe prime, generator 2
This is going to take a long time
................................+.............++*++*++*
生成TLS私密文件:
# cd keys
# openvpn –genkey –secret ta.key
# cd ..
生成客户端证书,例如awsok与awsok1两个用户:
# ./build-key awsok1
Generating a 1024 bit RSA private key
.++++++
..........................................................................++++++
writing new private key to 'awsok1.key'
-----
You are about to be asked to enter information that will be incorporated
into your certificate request.
What you are about to enter is what is called a Distinguished Name or a DN.
There are quite a few fields but you can leave some blank
For some fields there will be a default value,
If you enter '.', the field will be left blank.
-----
Country Name (2 letter code) [JP]:
State or Province Name (full name) [JP]:
Locality Name (eg, city) [Tokyo]:
Organization Name (eg, company) [heylinux.com]:
Organizational Unit Name (eg, section) [MyOrganizationalUnit]:
Common Name (eg, your name or your server's hostname) [awsok]:
Name [EasyRSA]:
Email Address [awsok@gmail.com]:

Please enter the following 'extra' attributes
to be sent with your certificate request
A challenge password []:
An optional company name []:
Using configuration from /etc/openvpn/easy-rsa/2.0/openssl-1.0.0.cnf
Check that the request matches the signature
Signature ok
The Subject's Distinguished Name is as follows
countryName           :PRINTABLE:'JP'
stateOrProvinceName   :PRINTABLE:'JP'
localityName          :PRINTABLE:'Tokyo'
organizationName      :PRINTABLE:'awsok.com'
organizationalUnitName:PRINTABLE:'MyOrganizationalUnit'
commonName            :PRINTABLE:'eric'
name                  :PRINTABLE:'EasyRSA'
emailAddress          :IA5STRING:'awsok@awsok.com'
Certificate is to be certified until Jan 26 09:52:03 2025 GMT (3650 days)
Sign the certificate? [y/n]:y


1 out of 1 certificate requests certified, commit? [y/n]y
Write out database with 1 new entries
Data Base Updated
# ./build-key awsok
Generating a 1024 bit RSA private key
......................++++++
......................++++++
writing new private key to 'awsok.key'
-----
You are about to be asked to enter information that will be incorporated
into your certificate request.
What you are about to enter is what is called a Distinguished Name or a DN.
There are quite a few fields but you can leave some blank
For some fields there will be a default value,
If you enter '.', the field will be left blank.
-----
Country Name (2 letter code) [JP]:
State or Province Name (full name) [JP]:
Locality Name (eg, city) [Tokyo]:
Organization Name (eg, company) [awsok.com]:
Organizational Unit Name (eg, section) [MyOrganizationalUnit]:
Common Name (eg, your name or your server's hostname) [awsok]:
Name [EasyRSA]:
Email Address [awsok@gmail.com]:

Please enter the following 'extra' attributes
to be sent with your certificate request
A challenge password []:
An optional company name []:
Using configuration from /etc/openvpn/easy-rsa/2.0/openssl-1.0.0.cnf
Check that the request matches the signature
Signature ok
The Subject's Distinguished Name is as follows
countryName           :PRINTABLE:'JP'
stateOrProvinceName   :PRINTABLE:'JP'
localityName          :PRINTABLE:'Tokyo'
organizationName      :PRINTABLE:'awsok.com'
organizationalUnitName:PRINTABLE:'MyOrganizationalUnit'
commonName            :PRINTABLE:'awsok'
name                  :PRINTABLE:'EasyRSA'
emailAddress          :IA5STRING:'awsok@gmail.com'
Certificate is to be certified until Jan 26 09:52:49 2025 GMT (3650 days)
Sign the certificate? [y/n]:y


1 out of 1 certificate requests certified, commit? [y/n]y
Write out database with 1 new entries
Data Base Updated
7. 编辑服务器配置文件:
# vim /etc/openvpn/server.conf
port 1194
proto udp
dev tun
ca /etc/openvpn/easy-rsa/2.0/keys/ca.crt
cert /etc/openvpn/easy-rsa/2.0/keys/awsok.com.crt
key /etc/openvpn/easy-rsa/2.0/keys/awsok.com.key
dh /etc/openvpn/easy-rsa/2.0/keys/dh1024.pem
server 10.192.170.0 255.255.255.0
ifconfig-pool-persist ipp.txt
push "redirect-gateway def1 bypass-dhcp"
push "dhcp-option DNS 172.31.0.2"
push "dhcp-option DOMAIN-SEARCH ap-northeast-1.compute.internal"
push "dhcp-option DOMAIN-SEARCH ec2.drawbrid.ge"
client-to-client
keepalive 10 120
comp-lzo
user nobody
group nobody
persist-key
persist-tun
status /var/log/openvpn/openvpn-status.log
log         /var/log/openvpn/openvpn.log
log-append  /var/log/openvpn/openvpn.log
verb 3
注解:在以上配置文件中,
采用了udp协议,较tcp协议而言,在较差的网络情况下效果更好;
指定了ca, cert, key, dh等文件的具体路径;
分配了virtual IP地址段10.192.170.0给VPN客户端;
启用了ipp.txt作为客户端和virtual IP的对应表,以方便客户端重新连接可以获得同样的IP;
启用了redirect-gateway的push功能,这样客户端会在连接后默认设置为所有流量都经过服务器;
启用了dhcp-option的push功能,这样可以将EC2的默认DNS解析配置推送到客户端,并自动配置其DNS解析文件(如MacOS中的/etc/resolv.conf);
启用了client-to-client,使客户端之间能够直接通讯;
启用了nobody作为user和group来降低OpenVPN的执行用户权限;
启用了TLS认证;
启用了lzo压缩;
指定了独立的日志文件;
创建日志文件目录:
# mkdir -p /var/log/openvpn
# chown openvpn:openvpn /var/log/openvpn
8. 启动OpenVPN服务
# /etc/init.d/openvpn start
# chkconfig openvpn on
9. 配置服务器,开启NAT数据转发和相关端口
# vim /etc/sysctl.conf
...
net.ipv4.ip_forward = 1
...
# sysctl -p
# iptables -t nat -A POSTROUTING -s 10.192.170.0/24 -o eth0 -j MASQUERADE
# iptables -A INPUT -p udp –dport 1194 -j ACCEPT
# iptables -A INPUT -m state –state ESTABLISHED,RELATED -j ACCEPT
# /etc/init.d/iptables save
# /etc/init.d/iptables restart
# chkconfig iptables on
注意:如果使用的是云主机如EC2,端口过滤相关的配置则需要跳过,然后到Security Group中进行设置。
10. 配置OpenVPN客户端
将服务器端生成的相关证书统一复制到一处,如针对awsok用户:
# mkdir -p /home/awsok/tmp/openvpn
# cd /home/awsok/tmp/openvpn
# cp -rpa /etc/openvpn/easy-rsa/2.0/keys/ta.key .
# cp -rpa /etc/openvpn/easy-rsa/2.0/keys/ca.crt .
# cp -rpa /etc/openvpn/easy-rsa/2.0/keys/awsok.crt .
# cp -rpa /etc/openvpn/easy-rsa/2.0/keys/awsok.key .
配置awsok用户的ovpn配置文件:
# vim awsok.ovpn
client
dev tun
proto udp
remote 54.238.131.140 1194
resolv-retry infinite
nobind
persist-key
persist-tun
ca ca.crt
cert awsok.crt
key awsok.key
remote-cert-tls server
tls-auth ta.key 1
comp-lzo
verb 3
将相关证书文件与ovpn配置打包:
# cd /home/awsok/tmp
# tar cf openvpnlinux.tar openvpn
将打包过后的openvpnlinux.tar下载到本地;
在Windows中,下载并安装OpenVPN Client:
下载地址:http://openvpn.net/index.php/download.html
然后将相关的证书文件和rainbow.ovpn配置放到C:/Program Files/OpenVPN/config目录下,到桌面双击OpenVPN图标并选择指定的选项即可;
在MacOS中,下载并安装Tunnelblick:
下载地址:https://code.google.com/p/tunnelblick/
然后,将openvpn_heylinux.tar解压并重命名为heylinux.com.tblk;
再通过Finder找到heylinux.com.tblk并双击即可;
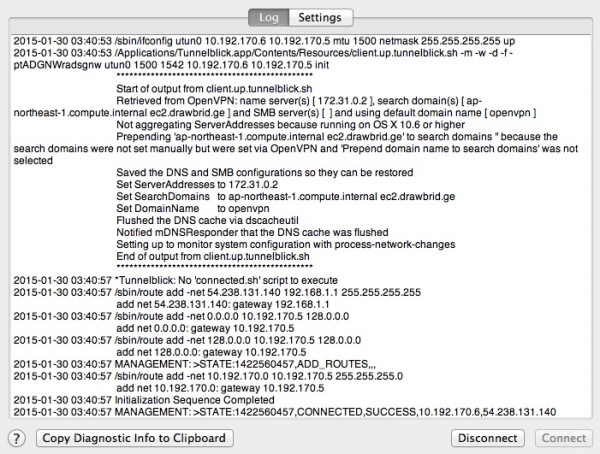
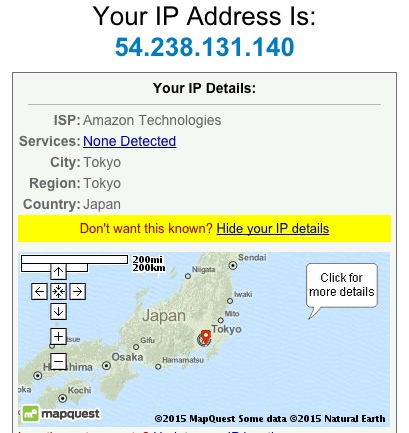
11. 以下,是我在MacOS中成功连接后的相关截图:
12. 更简单容易的解决方案:https://www.digitalocean.com/community/tutorials/openvpn-access-server-centos